Most of the times we have a requirement from the client to show videos on the home page for marketing purpose or to promote the brands. At that time I looked into the internet for so many different players but I found the Flow Player as the Most efficient and easy to integrate it.
Note:- Download source code at the end of this blog.
Below are some of the Features of Flow Player which make him so much popular:-
As FlowPlayer runs on Flash Video Object, so it can virtually handle all format which are supported by flash.
Here I am going to show you the small demo about how to integrate Flow Player in Liferay and play videos with the help of it.
List of the necessary files required in order to integrate Flow Player with Liferay are as below:-
jquery1.8.js - Javascript file required for the Flow Player.
flowplayer-3.2.12.min.js - Javascript file required for the Flow Player.
flowplayer.ipad-3.2.12.min.js - Optional Javascript file required for the Flow Player to make Ipad Compatible.
flowplayer-3.2.16.swf - Flash File required in order to play Video or Audio.
flowplayer.controls-3.2.15.swf - Flash File which contains Controls of Flow Player like Volume Control, Slider, Play/Pause etc.
We can integrate the Flow player in two ways either we can use Web Content(Structure/template) or directly integrate in the Liferay Portlet.
Here we are going to see Flow Player integration with Web Content(Structure / Template)
There are three ways to include the Javascript and Flash file :-
1) If you have developed a theme for your site then put the Javascript and Flash files in theme and then include in Velocity(Template).
2) Put the JavaScript and Flash Files in the Document and Media.
3) Most appropriate way, put the Javascript files in the Theme and Flash Files in Document and Media.
We have added three fields in XML Schema as per above screenshot.
VideoFile - Type as Text-Field (It will contain the path of the Video like Flv or mp4 file path).
SWFPlayer - Type as Document and Media ( It will have the flowplayer-3.2.16.swf file from the Document and Media).
SWFPlayerControl - Type as Document and Media ( It will have the flowplayer.controls-3.2.15.swf file from the Document and Media).
Now we are done with our Structure part.
2) Creating Template
After clicking on the Add Template button the below screen appears.
Name and Description are the fields in order to name the Template and also give appropriate description for that Template.
Cacheable is for caching the content.
Structure Selection is for selecting the structure that we have created
Language Type is for writting the Template code in different languages (VM,CSS,FTL,XSL)
Launch Editor will open the Screen in which you will be able to write the Template Code.
As you see in screenshot, the Editor with Default Code. Remove that Default Code and add below code in your editor.
Click on update button of Editor and now Save the Template.
Explanation of Template Code
There are two option either Basic Web Content or Flow Player :-
If you select Basic Web Content then you have to manually select Structure and Template for that web content.
But if you select FlowPlayer then it will automatically select Structure and Template of Flow Player.
After Clicking on it below screen appears.
Title - Will be appropriate title for the Web Content
Video file - It is the parameter that we defined in the Structure. Add the appropriate path of the Video File
SWF Player & SWF Control File that we need to select it from the Document and Media as we have specified in Structure.
After selecting the SWFPlayer and SWFPlayer Control appropriate SWF's. Click on the Publish Button.
Your Web Content is Created.
Now go any page in the site with Site Administrator or Administrator as a Role in liferay.
You will see the ADD Button on the DockBar.
Click on the ADD Button and select Web Content Display Portlet. It will appear in the page.
From the Web Content Display Portlet select Flow Player. It will appear as below :-
Congrats !! Now your job is done.
Download complete source code from here.
Hope it will be useful.
Note:- Download source code at the end of this blog.
Below are some of the Features of Flow Player which make him so much popular:-
- Basic Features
- Play/Pause Controls
- FullScreen
- Playlist
- Advance Features
- Common Clipping ( for eg. :- you can set the duration for all the files in the playlist to play for only 5 seconds )
- Clipping ( for eg. :- you can set the duration for each and every individual file in the playlist)
- Advertising ( You can integrate Advertising in the Flowplayer same as you see in the youtube )
- Streaming ( Online streaming from live server )
As FlowPlayer runs on Flash Video Object, so it can virtually handle all format which are supported by flash.
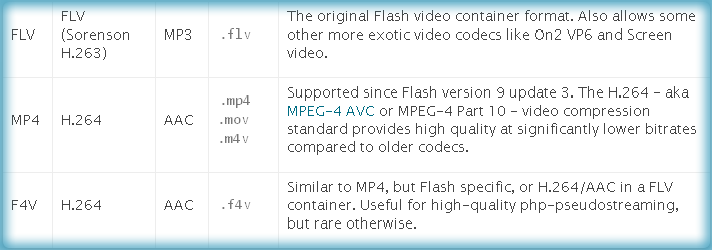 |
| Supported Video Format |
Here I am going to show you the small demo about how to integrate Flow Player in Liferay and play videos with the help of it.
List of the necessary files required in order to integrate Flow Player with Liferay are as below:-
jquery1.8.js - Javascript file required for the Flow Player.
flowplayer-3.2.12.min.js - Javascript file required for the Flow Player.
flowplayer.ipad-3.2.12.min.js - Optional Javascript file required for the Flow Player to make Ipad Compatible.
flowplayer-3.2.16.swf - Flash File required in order to play Video or Audio.
flowplayer.controls-3.2.15.swf - Flash File which contains Controls of Flow Player like Volume Control, Slider, Play/Pause etc.
We can integrate the Flow player in two ways either we can use Web Content(Structure/template) or directly integrate in the Liferay Portlet.
Here we are going to see Flow Player integration with Web Content(Structure / Template)
There are three ways to include the Javascript and Flash file :-
1) If you have developed a theme for your site then put the Javascript and Flash files in theme and then include in Velocity(Template).
 |
| 1. Folder Structure in theme |
2) Put the JavaScript and Flash Files in the Document and Media.
 |
| 2. Files in Document and Media |
3) Most appropriate way, put the Javascript files in the Theme and Flash Files in Document and Media.
 |
| 3.1 Files and Folder in Theme |
 |
| 3.2 Files in Document and Media |
Here we are using the third approach.
After configuring the files, now we will start with creating the web-content.
Web Content is Divided in three Parts as below :-
After configuring the files, now we will start with creating the web-content.
Web Content is Divided in three Parts as below :-
1) Creating Structure. 2) Creating Template. 3) Creating Content.
 |
| 4. Liferay 6.1 Web Content |
1) Creating Structure
 | |
| 4.1 Creating Structure |
After Clicking on the Add Structure button the below screen appears.
 |
| 4.1.1 Structure GUI |
Name and Description are the fields in order to name the Structure and also give appropriate description for that structure.
After Scrolling Down you will find XML Schema Definition section. Click on the Add Row button and go on adding as per below screenshot.
 |
| 4.1.2 Structure XML Schema GUI |
VideoFile - Type as Text-Field (It will contain the path of the Video like Flv or mp4 file path).
SWFPlayer - Type as Document and Media ( It will have the flowplayer-3.2.16.swf file from the Document and Media).
SWFPlayerControl - Type as Document and Media ( It will have the flowplayer.controls-3.2.15.swf file from the Document and Media).
Now we are done with our Structure part.
2) Creating Template
 |
| 4.2 Lifeay 6.2 Creating Template |
 |
| 4.2.1 Template GUI |
Cacheable is for caching the content.
Structure Selection is for selecting the structure that we have created
Language Type is for writting the Template code in different languages (VM,CSS,FTL,XSL)
Launch Editor will open the Screen in which you will be able to write the Template Code.
As you see in screenshot, the Editor with Default Code. Remove that Default Code and add below code in your editor.
Click on update button of Editor and now Save the Template.
Explanation of Template Code
- $image-path will find the image path from theme.
- 2nd and 3rd line is for importing the javascript file that we need to include in Flow Player. But one important thing is that as our Javascript File is in the JS Folder so we moved upto JavaScript Path from ImagePath accordingly.
- Now we have defined link with id as player and href is the location where we will get video file path from the Web-Content Dynamically.
- As we have written Flow Player configuration in ready function of the JavaScript. So When the page will be loaded and it will be ready then Javascript ready function will get called. In that our Flow Player function will be called.
- First parameter in the flow player function is the id of the anchor where we want to place the flow player.
- Second parameter in the flow player function is the parameter that contains the Main SWF File Path.
- Third Parameter is the Plugins of the Flow Player. Here we used Play/Pause, Slider that contains inside the Plugins swf.
- We can add more parameter if we want in the Flow Player functions.
 |
| 4.3 Create Web Content |
There are two option either Basic Web Content or Flow Player :-
If you select Basic Web Content then you have to manually select Structure and Template for that web content.
But if you select FlowPlayer then it will automatically select Structure and Template of Flow Player.
After Clicking on it below screen appears.
 |
| 4.3.1 GUI of Web Content |
Video file - It is the parameter that we defined in the Structure. Add the appropriate path of the Video File
SWF Player & SWF Control File that we need to select it from the Document and Media as we have specified in Structure.
After selecting the SWFPlayer and SWFPlayer Control appropriate SWF's. Click on the Publish Button.
Your Web Content is Created.
Now go any page in the site with Site Administrator or Administrator as a Role in liferay.
You will see the ADD Button on the DockBar.
Click on the ADD Button and select Web Content Display Portlet. It will appear in the page.
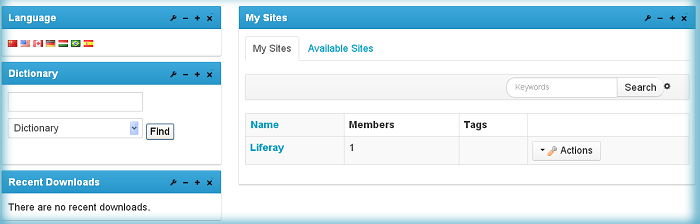
From the Web Content Display Portlet select Flow Player. It will appear as below :-
 |
| Flow Player integrated with Web Content |
Congrats !! Now your job is done.
Download complete source code from here.
Hope it will be useful.


